How To Re-Deck A Western Star
Whenever doing any maintenance requiring the removal and rebuilding of any parts or structure, I would recommend that you take lots of photos, before, during and after the process to get things back as original, if you cannot photograph then make sketches before starting out. Never rush, take your time. Find a decent workplace. Have everything that you will need before you start your project.
Taking Apart.
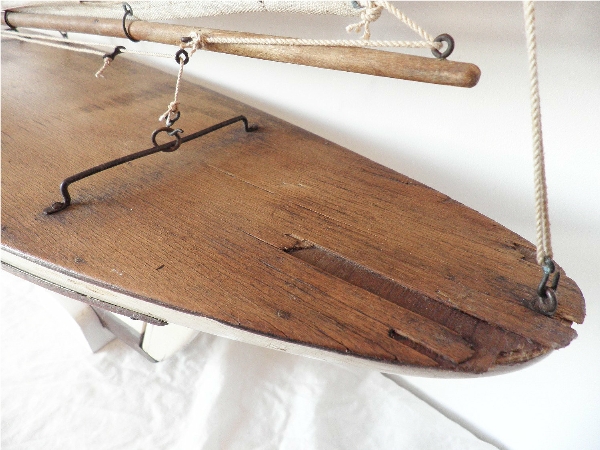
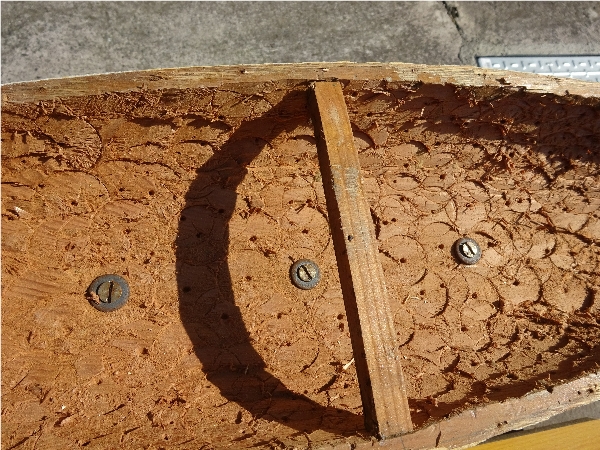
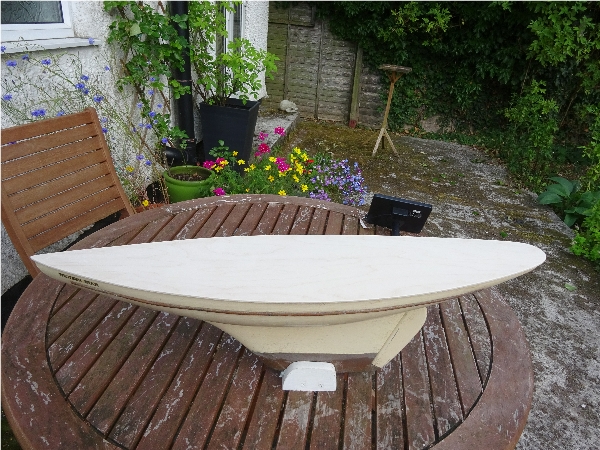
Starting with above deck, the sails and masts were removed, wrapped and stored, then the deck furniture removed and placed in sealable container taking note what went where. Then the point of no return, I eased a decorators 2" scraper into the join between the deck and hull from the rear forward, made easier due to de-lamination, all of the decking pins pulled through the plywood deck and remained in the hull. I set the deck aside then removed the deck pins around the hull edge with pliers, although rusty, all came out okay. On the larger yachts, they have a camber brace running widthways across the hull to give a curvature to the deck, I marked with a pencil where this sits in the hull, then to remove this I used the pointed ends of a pair of wire cutters, digging in and gently pulling out the pins either side of the hull. Next I cleaned all of the surfaces and ends of the camber brace.
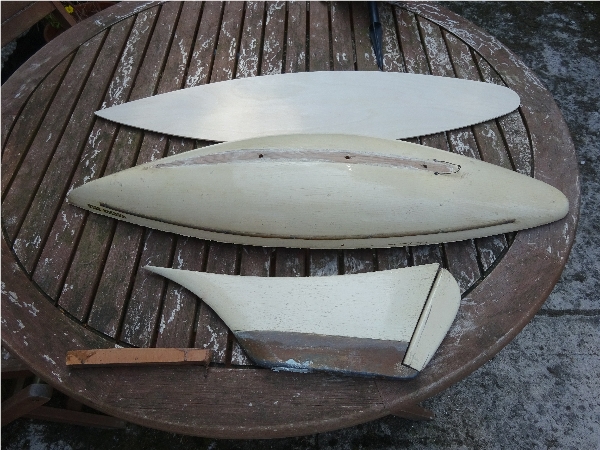
I actually went further and removed the keel which is fixed in place on the larger yachts by three large screws and heavy washers (Two screws on smaller yachts) by clamping the keel in the jaws of a wooden workbench and using the largest screwdriver that will fit the slots of the screws along with a plumbers pipe grip on the screwdriver handle. I then cleaned up the mating surfaces ready for re-assembly.
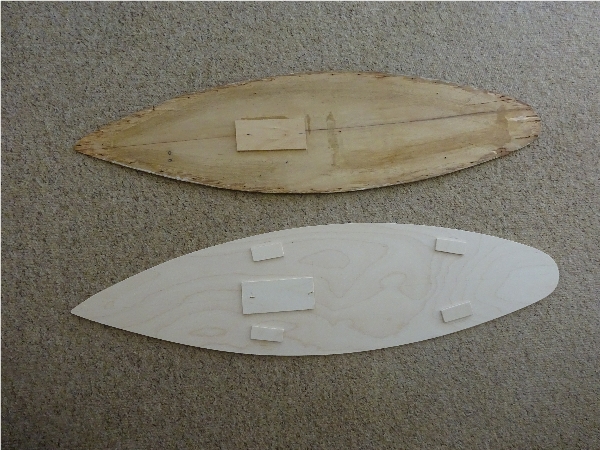
Back to the deck, I turned over the original deck to find a reinforced panel for the mast mount, I made a quick template out of card of the shape and noted that it was held in place by glue and a couple of panel pins. I also made four small panels to fit below where the sheet horses where fitted as they had loosened in their holes on the original deck. Next I turned the deck back upright and with a sharp pencil, drew a line around the circumference on a piece of card, this has to be as near as possible but can be altered later on. The earlier and larger yachts were hand made and the deck shape will not be mirror image so mark your card "Top" so you know it will be the right way up for the next part.
When buying plywood, always go for the best quality you can afford with real wood in the sandwich not filler as with cheaper examples - you only want to do this job once! I used German birch 3mm plywood with not so much grain and a nice pale colour. Picking the best side and area, I placed the deck template in place and drew around it with a pencil, then placing the ply on a workbench, used a jigsaw with a metal grade saw blade (Smaller teeth) to first rough cut out the deck and then to follow the shape about 1/4" out, cutting from the centre of the length towards each end to minimise any splintering of the ply. Then using a flat plane, reduced the excess back to the line again working from the centre of each side towards the ends. Finally using a block and sandpapers to smooth and profile the cut edges. You can check the fit of the deck by tapping in a panel pin about 3/4" from each end and into the hull just enough to grip it in place.
Next, have a look at your original deck and note where the perimeter deck plank line and the deck pin positions are. This is to work out where you are going to knock in your deck pins, mine where about 7/16" (1cm) in from the edge, so using a sharp pencil taking care, I scribed a line around the whole deck, this ended up for me being the perimeter plank line.
Reassembly.
Original glue was in blocks and had to be heated in a pan to make it usable. I use Cascamite glue with wood and this is probably the nearest to the original glue used in the factory on the early yachts. Cascamite comes in a powder, is easy to mix, gives you a good time to fix parts in place and is a permanent repair. I also used brass panel pins on reassembly as I did not want the rust returning and staining the deck.
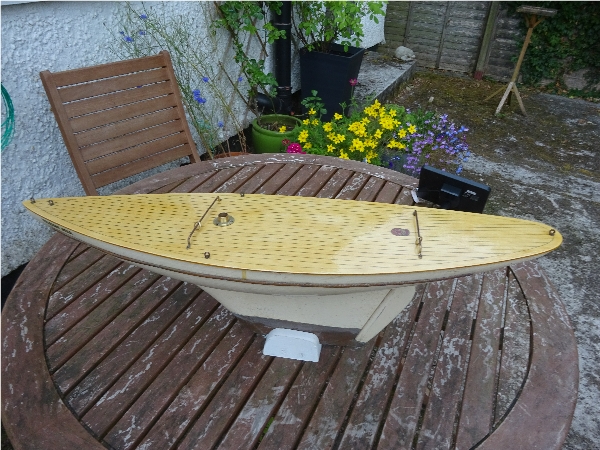
Starting with the deck itself, I mixed a small amount of Cascamite and applied it to the reinforced panels for the mast mount and sheet horses, placed into position using the old deck as a template and turning over for the mast mount, tapped a few pins through from the top, countersunk them using a small pin punch then turning over again, bent the pins up to fix out of the way. The strengtheners for the sheet horses were just glued into place. The deck was then left until the next day for the glue to cure.
To refit the keel, I clamped it upright in the workbench, then mixed enough of the glue for the whole job, put a sealing amount of glue on the mating edge, positioned the hull and washers, screwed the three screws back in and tightened up with the plumbers wrench. Putting a dap of glue on each end of the camber brace, this was positioned back between the pencil lines and a brass pin knocked in each side making sure the brace was square to the deck. Working quickly I applied a seal of glue around the deck edge and fixed the deck into position using the two pins previously used to check the fit, these were driven home flush to the surface. Next, looking through the gap under the deck, I could see where the camber brace was and marked a spot on the deck surface to tap in a pin. Checking the pin spaces on the original deck, I started from the centre point on each side and working towards each end tapped in the pins. When all was done, I went around and countersunk all the pins with a small pin punch. Turning the hull over, any excess glue was cleaned away. I then went around all the pin holes and filled over with wood filler, not forgetting the camber brace pin holes. The hull was then left until the next day to cure.
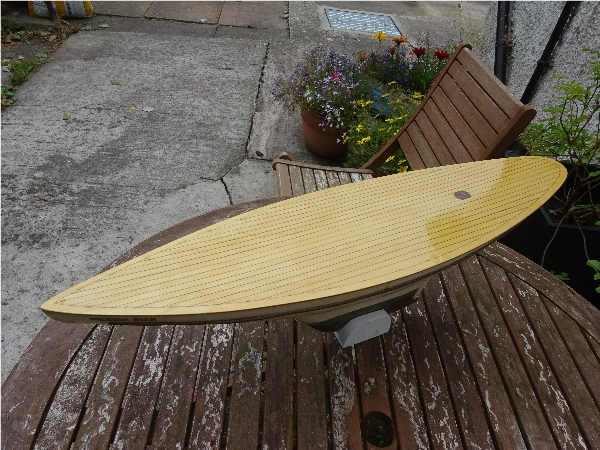
Next day, I smoothed down the wood filler with very fine sandpaper going with the grain so not to mark the ply finish and checking the deck edge for overlap made some final trimming. On the larger yachts, the bow section of the deck is reduced to no overhang as to stop deck damage if the yacht hit the wall of a boating lake. Using a sharp pencil, I re-drew the perimeter deck plank line. Then measuring across the stern I made a dot mark for the centre line. Using a metal metre rule, I then scribed a centre line from the stern to the point at the bow. With a steady hand I proceeded to draw parallel lines about 3/8" from the centre line out towards the edge of the deck, one side then the other. My Western Star was an early one with parallel deck plank lines, later versions had radial lines that followed the deck edges. If you waver or make a mistake then you just remove the line with an eraser and redraw.
Varnishing the deck.
Don't scrimp on this part, always get the best varnish and brushes that you can afford, don't forget some thinners for the varnish to clean your brushes in. For the Western Star, I used International "Schooner" varnish which like the original is oil based. For paint brushes, I used Harris varnish brushes. If you want a deeper colouring to look like an aged deck then you can colour the varnish, I used oil based "Light Oak" stain. Mix a small amount of varnish and stain in a jam jar, the mix goes a milky colour before the true colour so don't be put off. Mix it a bit darker than you want and apply in long brush strokes lengthways not forgetting the edge overhang, I applied four coats, leaving for a day in between coats only sanding smooth after the second coat if necessary, brush out any air bubbles. Before the last coat I applied the deck logo transfer. Leave for about 3 days to shrink back before installing deck furniture using the old deck for reference to positioning the parts. Lastly, the paint on the hull, if it has chipped away just touch in with an artists paintbrush, Humbrol paint Ivory No. 41 for early or White No. 22 for later hulls should be a close match.
Materials used
36" x 12" German birch 3mm (1/8") plywood, Cascamite resin glue, International "Schooner" varnish & thinners, "Light Oak" oil based stain, Ronseal natural wood filler, 15mm brass panel pins, Harris varnishing brushes, 2" paint scraper, HB, 1B or B pencil, small nail pin punch, flat plane, block and sandpapers.
The above procedure can be used in a more basic form for the smaller hollow yacht ranges.